Having a hard time cleaning your gas grill? Follow these 8 steps on how to clean a gas grill with minimal effort.
A gas grill is the star of every barbecue event in your backyard. Once you are in front of it, flipping your burgers, steak or whatever protein you are cooking, you definitely feel quite the badass home chef. It is easy to transform your everyday meal into a feast and elevate recipes by adding that char and smokey flavor that only grilling can impart in your food. Let’s face it, you consider your gas grill one of the best inventions in your lifetime.
There is no denying that it is one of the best investments you can ever make when it comes to cooking equipment. Your grill works hard for you and you definitely worked hard to get that top-of-the-line barbecue machine therefore, it is only natural that you want to ensure that it will keep on grilling for a long, long time. Unfortunately, constant use can lead to grime and dirt build up which will definitely impact the performance and the longevity of use of your gas grill.
You have to take care of your grill, ensuring that it remains in tip top shape and of course, continue to be spotless and clean. However, it cannot be denied that it can be quite a chore for some people especially those who are too busy to actually get down and dirty with a filthy gas grill. Still, it is important that you find the motivation to maintain the upkeep of your best barbecue pal and here are some reasons why.
- Keeping your gas grill nice and clean will expand the life span of your cooking grates as well as the interior components of the grill.
- Regularly cleaning your gas grill will eliminate harmful substances like carcinogens, ash, paint chips etc… so it will not contaminate the food you are cooking on it.
- A neat gas grill will ensure that the protein or any ingredient you cook on it will not get affected by old food particles or residue which can alter or affect the taste and texture of what you are currently grilling.
- Regular cleaning and upkeep mean lesser expense because all components will not be rotting away or corroding due residue of water, oil or any substance that can expedite the decomposition of your grill’s material.
If these significant reasons are still preventing you from having the motivation to keep your gas grill clean then, you might be relieved to know how to clean a gas grill with minimal effort.
But, before you begin the step-by-step process of giving your barbecue machine some good scrubbing, you have to prepare the materials that you will need. Again, do not worry because these are stuff that you usually have around the house. So, you won’t have to drive to the store, definitely saving you time, effort and gas money!
Cleaning Materials
- Sponge
- Liquid soap and water
- Rags
- Wire grill brush or wire scrubber
- Crumpled aluminum foil (in case you don’t have a brush or wire scrubber.)
Other optional cleaning aides:
- Hand held vacuum cleaner
- Gloves (if you want to keep your hands clean when handling the grates.)
How to Clean a Gas Grill with Minimal Effort
Step 1: Heat it up!
Turn on your gas grill and let it heat up for about 15 minutes with the lid closed. The high temperature will help burn off any residue or huge deposits of meat or grease which could be stuck in or between your grates.
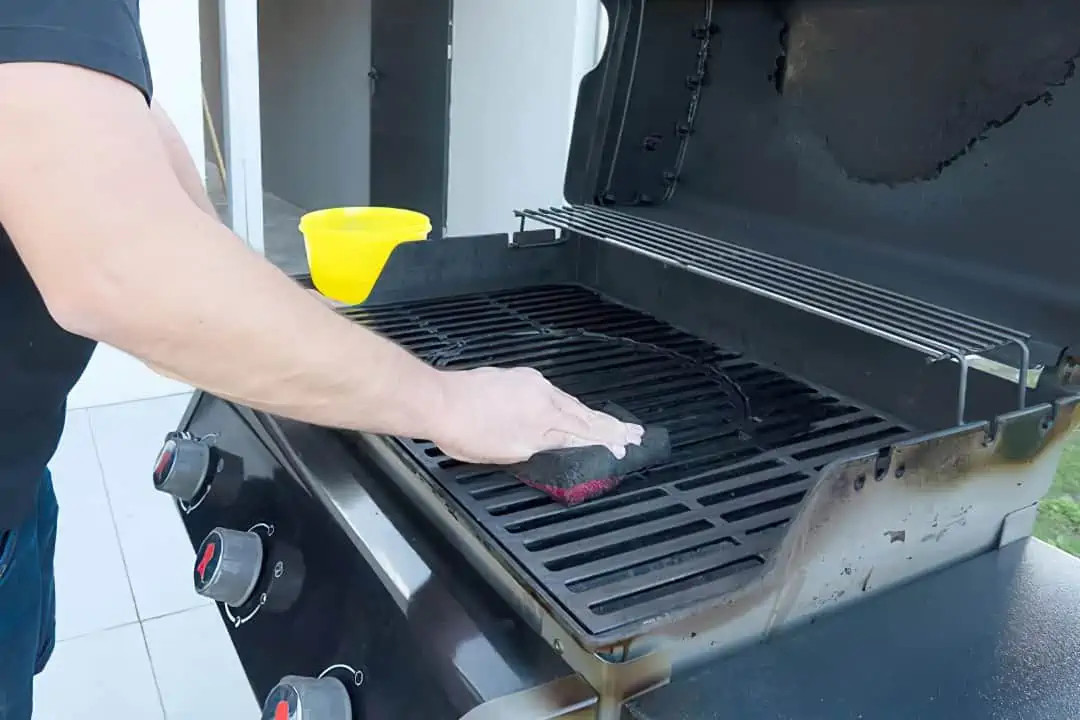
If you feel like the interior chamber of your grill is at its maximum temperature, get your wire grill brush or foil and begin scrubbing the grates.
Don’t worry because this might be the only part which requires extra energy and effort from you. Besides, you have to give your grates some special scrubbing treatment since this is where most of the cooking happens and they are most often than not, the dirtiest.
Step 2: Turn Off the Gas
Once you are done with step one, grab a cold beer or glass of lemonade and relax as you let your gas grill cool down. After a few hours, locate your gas valves and turn off the gas source. These valves are usually near your grill or you might find them in your front yard.
It is also important that you remove the propane tank hose, you can also check your propane tank while you’re at it to make sure that you still have enough left for your next planned barbecue or if your tank has expired already.
Step 3: Pull Out the Removable Parts
This step requires some minimal lifting on your part after you make sure that your gas supply is turned off. Remove the grill grates, they are not attached to the grill so they will easily be lifted off and set it aside. Use your gloves if you don’t want your hands to be grimy.
Remove the metal pieces covering your burners, these are located below the grill grates. These are the plates that usually catch grease and grime whenever it falls off from the top grill grate. So, you definitely will want to get these cleaned off as well. If your gas grills have metal plates beneath the grates which are usually designed to catch food that might slip off, you also have to take these out.
Most grills also have an ash pan at the base which is used for discarding charred pieces and ash residue so, push all of the ash and charred pieces you see on your grill unto the pan and empty it. Set all these removable pieces aside.
Step 4: Vacuum or Wipe Down
After you have removed the grates, plates and burners, you will definitely be greeted by dirt, charcoal, ash and even food sitting on your grill. One of the easiest ways to clean this out is using a hand-held vacuum. Just run it through the surface, making sure you get into those corners and crevices, picking up whatever loose residue that is littered on your grill.
If you do not have a hand-held vacuum cleaner, then you may use a cloth and wipe off the dirty surface. Just use your old rags since gas grills tend to get really grimy and might ruin your new, clean towels.
Step 5: Soak and Let the Soapy Water Do Most of the Work
Remember those removable parts that you set aside? It is time to clean those off. If you are dreading the thought of having to scrub your grates vigorously, expending more energy and time than you are prepared to, then do not break a sweat.
Simply fill your sink with hot water and add some liquid dish soap then place your grill grates, burner coverings and ash pan in it. You can go watch TV or read a good book as you let these gas grill parts soak in hot, soapy water.
If your sink is too small for the grates and pan, you can use a plastic container that you have around the house or in storage. Fill that up with hot water and soap then soak your grill. You can scrub or wipe off loose dirt or grime before soaking them in the plastic container or sink.
Step 6: Clean Grill Exterior
While the smaller, grimier parts are soaking, you might want to clean the exterior of your grill as well. You do not need to scrub or do some heavy cleaning. Just use your sponge, dip it in soapy water and slowly wipe off the surface of your grill. Do pay attention to the knobs because grime could get stuck underneath it. Wipe it off with a damp rag and let it dry.
Step 7: Rinse and Wipe Off
After you have soaked your grates and metal parts for at least half an hour, pull the pieces one by one and proceed to wiping off the soap and grime from them. You may want to use a hose and rinse them or just simply use a damp rag.
If you find stains and residue that are a bit tough to wipe off then use your wire grill brush or crumpled up foil to get them off. Usually, stubborn stains might require resoaking before they can be totally removed by your brush or cloth.
Step 8: Return the Parts and Reconnect Gas
Let your parts air dry after you have wiped them off then, give them one more good wipe down but this time with a dry towel or rag. Return the pan and grill plates first then you reinsert your burner cover and finally your grilling grates. Once everything is in place, give your entire grill another wipe-down with a clean, dry rag just to make sure it’s spotless then reconnect the gas supply hose when you are done.
It is usually recommended that you use a protective cover for your gas grill when it is just sitting outdoors and not in use for some time. This will help protect it from outside elements that can cause it to rust or erode. Plus, it will keep the dust and debris from the outdoors from getting into your grill.
Conclusion
Cleaning your gas grill with minimal effort is possible and you will be surprised how quickly things can be done. So, if you want to avoid having to do some deep, heavy cleaning often then make sure you spend extra time tidying and cleaning up your gas grill after every use. This will ensure minimal grease or grime build up, keeping your equipment in top shape and easy to clean.
Hi, I’m Adam and I’m a HUGE fan of Food and Cooking.
Do you enjoy grilling sessions with your family while staring at the beautiful fire pit flames?
Flame Gorilla is the site to learn how to have that perfect backyard experience.