One of life’s greatest pleasures is a picnic in the open air. In order to get a barbecue’s smoky taste and high heat, many people choose to use charcoal as the ignition source; however, this approach can be costly and time-consuming.
Another simple and practical option are gas barbecues. As opposed to a gas grill , which can be fired up in less than a minute, a charcoal grill can often take close to 30 minutes to ignite. If you typically just barbecue on the weekends, a typical modern gas grill’s propane tank can last an entire summer.
It is straightforward and fast to install a propane tank on a gas grill or in a propane smoker. There are, however, a few things you should be aware of while connecting a propane tank to a barbecue. Here’s how to hook up propane tank to grill in 7 easy steps.
7 Steps on How to Hook up Propane Tank to Grill
1. Take Safety Precautions
The propane tank must be protected from damage at all costs. It’s not necessary to perform a thorough inspection when utilizing a brand-new tank, although it is safer.
Many people re-fill their propane tanks with the same gas and utilize the same tank. In this situation, it’s critical to make sure the tank is still in good shape.
Since the rubber gasket inside the tank’s valve can become worn over time, it should be examined. A tank gasket that is in good shape should be spherical and free of splits or cracks. So that there is sufficient light to see it clearly, point it toward the sun.
2. Remove the Old Propane Tank
You must first disconnect the old propane tank from your gas grill if it is still in place. While disconnecting the old tank is a rather quick and easy process, there are a few safety precautions that must be taken.
Steps to remove a used propane tank from a grill:
- Remove the gas control knob from your gas grill. On the old propane tank, shut off the gas valve as well. As the tank can still contain a little amount of gas, this is a preventative step. You wouldn’t want to be carrying around a tank that was leaking gas and could cause an explosion or fire.
- After that, just unscrew the gas hose that is attached to the tank to remove it. You’ll still need the gas hose to connect the new tank, so take care not to damage it.
- Lastly, remove the old propane tank with caution. Don’t drop or knock the tank over because there might be any gas inside it. Keep it away from anything combustible, including your barbecue, when storing it.
Remove the New Tank’s Protective Seal.
Now that the old tank has been removed, it’s time to install the new gas tank. However, you must first take off the seal’s covering. This cover, which is typically blue or red, is installed to prevent gas leaks while the gas is being stored.
To make it simple for you to remove the cover, it typically has a little incision. Once the cap is off, you should move on to the following step right away to avoid leaving the gas lying around and leaking while the top is off.
How To Check If There’s Enough Propane in The Tank
Make sure there is enough propane in the tank before learning how to attach a propane tank to a gas barbecue. Without this important step, you run the risk of running out of gas during a barbeque, which would leave the meat just partially cooked.
Using a pressure gauge is the fastest and most precise technique to determine how much propane is present in a tank. The pressure gauge will display how much gas is remaining after it is attached to the tank. Before grilling, you should have a backup tank available if your current tank is nearing empty.
The best pressure gauge is a basic one that is connected directly to the valve. Magnetic gauges can also be used, and these function by being positioned on the tank’s side. They operate by determining the propane’s temperature. These gauges, however, frequently break down and are short-lived.
3. Connecting the Tank to the Grill
Placing the tank on the grill
The tank needs to be properly mounted on the grill. The tank beneath the grill can be secured in a variety of ways depending on the grill model. While some grills have an open area beneath them, some have doors that conceal the tank in back. Near the bottom of many grills is a hole where the tank can be inserted. The correct tank placement will be demonstrated in the grill’s handbook.
As a result, the tank cannot be kicked or knocked over, which is crucial. The regulator connection may be stressed if the tank is installed differently than the handbook advises, such as farther away from the grill than is typical. A gas leak might occur as a result of this.
Connecting the grill hose to the tank
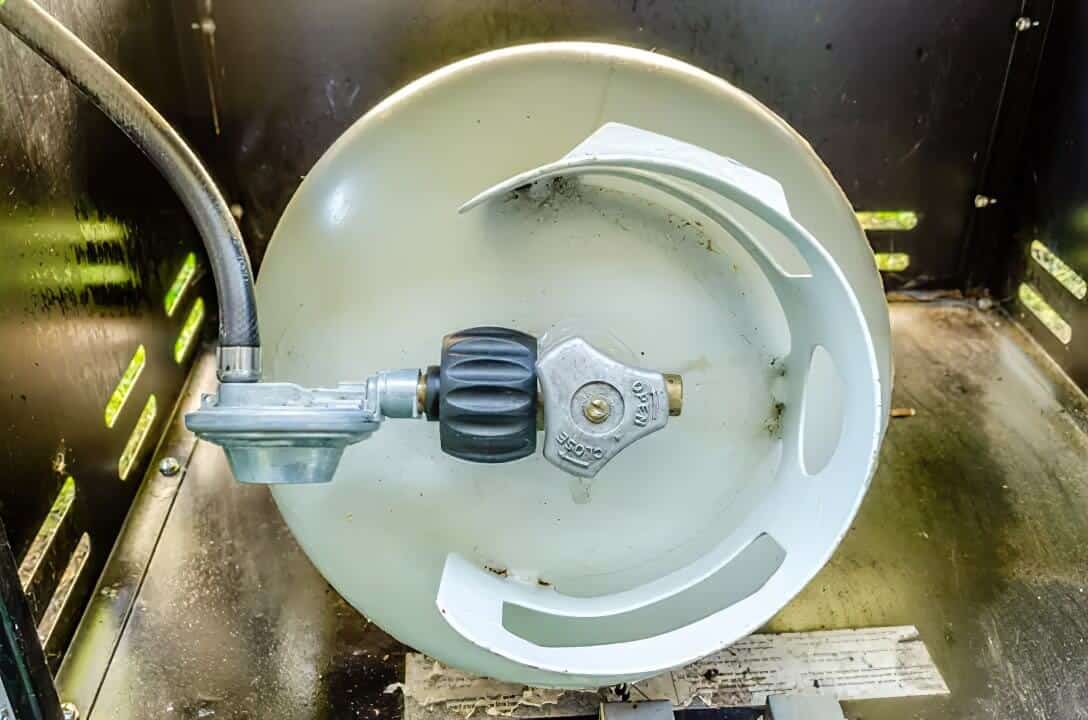
Those who have never used a gas barbecue should familiarize themselves with a few important components of the grill and the tank. The valve, located directly on top of the tank, is the most straightforward to spot. The hose that links the grill to the tank is also a feature of all gas grills. The hose’s end is equipped with a black plastic connector and a metal regulator.
The regulator is necessary to regulate the gas flow from your tank to the grill’s heating element. Every 15 years, it is suggested that the regulator be replaced. If you have a brand-new propane tank and the grill isn’t operating, it’s possible that the regulator has to be changed.
Take the hose and attach it to the tank to connect it to the gas grill. The section of the hose that attaches to the tank is the black plastic connection at the end of the hose. The connector can be tightened by turning it to the right, and it should be as tight as possible.
The connection between the propane tank and the grill is made at this point. Find the metal peg or nozzle that is attached to the device right next to where you removed the seal in the previous step. Connect the gas hose to this metal peg using the gas hose you removed from the old tank.
Screw it in. Don’t tighten it too much that it’s difficult to unscrew when you take it off later,. Verify your connection to make sure there are no wiggles or breaks.
Once the gas line is securely fastened, you can tighten it by rotating the coupler, the disc-shaped attachment at the front of your tank, to the right. Again, don’t tighten it too much so you can tighten it easily when your current tank runs out.
For those who don’t know, the coupler’s function is to regulate the gas flow to your gas barbecue.
4. Open the Propane Tank Valve
You’ve already completed the hardest part of the work and are almost finished. You must turn on the valve atop your propane tank. Adjust the valve so that it is pointing in the open direction. Remember that the purpose of this valve is to stop gas from flowing while it is being stored.
If you are taking out your propane gas tank, you should always turn it off. If you don’t, there’s a chance that the combustible gas will leak out of the tank and start a fire.
5. Inspect the Connection for Leaks
A gas leak test on your connection is also necessary for safety reasons. Turn on the tank valve while keeping all of your grill’s control knobs in the OFF position. Next, spray some soapy water into the regulator connection while keeping an eye out for bubbles. If you see any bubbles, there is a leak there.
To determine the source of the issue, shut off the propane tank valve, remove the regulator, and check your tank valve gasket.
6. Get Down to Grilling!
Your system is safe to use if you can’t find any leaks. Now that you’ve reached this phase, you can begin grilling your food. Make sure you have the owner’s manual from the gas grill’s maker if you’re using one for the first time so you can use it safely.
7. After Using the Grill
Of course, when the grill isn’t in use, the propane tank valve should be shut off. The valve should be closed, but the tank does not need to be unhooked from the grill. Because extremely little amounts of gas might escape from the tank and pose a major fire threat, it is crucial for safety reasons.
Aside from safety considerations, leaving the valve open might harm the grill. The gas may not flow well in a condition called as bypass as a result of it. When this occurs, it could be challenging for the grill to attain the ideal cooking temperature.
Conclusion
You may easily do it yourself and don’t need to pay a professional to connect a propane tank to your gas barbecue. You can set up your propane gas tank in a matter of minutes and begin grilling your favorite food by simply following the essential steps provided in this guide and paying attention to the numerous safety precautions.
Make sure to follow all applicable safety precautions for a risk-free gas grilling experience. Keep in mind to read the instructions in your grill’s user manual before attaching a propane tank to the model of gas grill you have.
Hi, I’m Adam and I’m a HUGE fan of Food and Cooking.
Do you enjoy grilling sessions with your family while staring at the beautiful fire pit flames?
Flame Gorilla is the site to learn how to have that perfect backyard experience.