Want a fire pit but don’t want a smokey backyard? Learn how to build a smokeless fire pit (DIY Smokeless Fire Pit) in this article.
Enjoying your very own fire pit within the confines of your backyard should be something you can look forward to. Unfortunately, not everyone lives in a place or neighborhood where in the smoke and fumes from an open fire pit is appreciated by the people next door. There are even some places or cities that will slap fines on homeowners who tend to build huge fires in their backyards.
In all honesty, not everyone enjoys the smoke that billows from a bonfire and it can pretty much ruin the whole ambiance of the night. You and your family as well as friends would really rather just focus on the warm, cozy blazing fire without having to worry about watery eyes, stinging from the smoke. You also do not want the smell of burning wood sticking to your clothes and your hair by the time the evening is over.
Good thing that as technology progressed, these issues with a fire pit are finally addressed and a solution has been made, a smokeless fire pit!
Smokeless fire pits have been on high demand ever since people realized that you can actually enjoy a fire without the smoke. It is widely popular and there are several off-the-shelf models that people can buy in stores and online. There is no denying that these smoke-free fire pits are selling like hotcakes!
Unfortunately, really good and reliable models of smokeless fire pits can get pretty expensive. Factory built models can actually ranges from $500 to $1,000. These are the types that are suitable and made for outdoor bonfires. Luckily, there is a way for you to build one right in your backyard.
What Makes a Good DIY Smokeless Fire Pit?
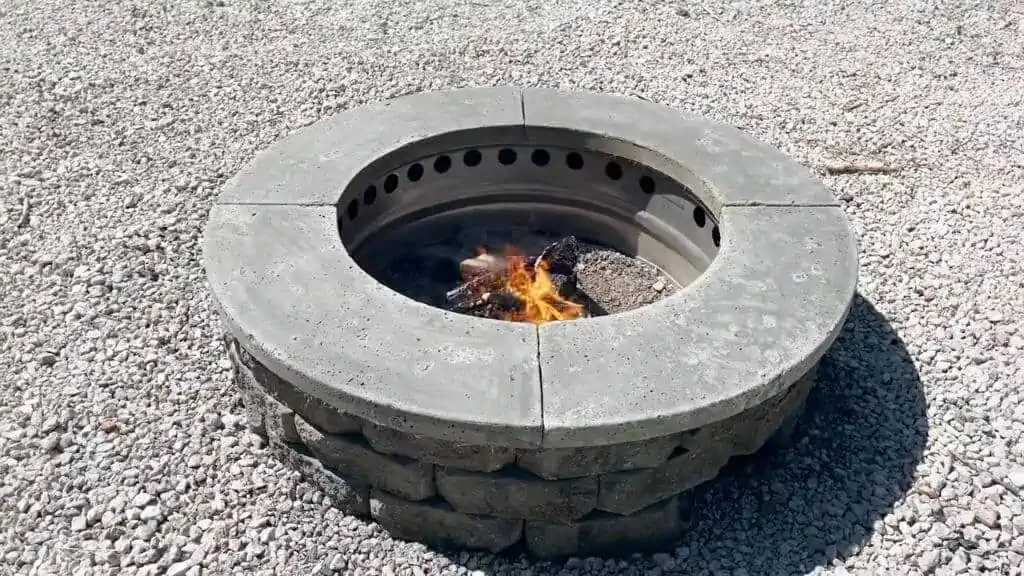
- A smokeless fire pit should have a lot of small upper vent holes.
- The fire should be elevated away from the fire bowl or the combustion chamber’s base so it allows optimum airflow and oxygenation.
- A smokeless fire pit needs lots of air coming in at the base of the fire.
- You should be able to grill on your smokeless fire pit.
There are several DIY smokeless fire pit options that you can choose from. In fact, you can even lessen smoke emission from the traditional way that you create a fire while camping out or in an existing fire pit.
DIY Smokeless Fire Pits Using Basic Fire Creations
The Charcoal Method
Materials: Bricks, Charcoal, Fire starter, Tinder, Newspaper
Step 1: Stack and set up your bricks in a circular shape. You have to build it in a way that it will trap as much heat as it can manage. Two or three blocks can be used to keep the fire within, just leave enough space to keep the fuel in.
Step 2: Place a piece of newspaper inside the structure along with 3 pieces of tinder. Arrange the tinder in a triangle, flat shape in the middle of the paper.
Step 3: On top of the first tinder triangle, add 3 more pieces of tinder making a separate triangle. Repeat the process until you have created a nest of a six-pointed star tinder.
Step 4: Put a fire starter in your fire pit and start the fire. Once a fire is going, slowly introduce charcoal into the pit as the fire gets brighter.
The Upside-Down Campfire Method
Materials: Different sizes of logs, Paper, Kindling.
Step 1: Stack the logs with the bigger ones on the bottom, putting the small ones on top.
Step 2: Place a fair amount of kindling on top of your pile. Ensure that there is at least 2 inches of kindling on top of your fire pit.
Step 3: Crumple your piece of paper and place it right on top of the kindling
Step 4: Light the paper on fire and watch as the paper’s flame runs downwards, taking a smokeless fire with it.
These methods will create smoke in the first couple of minutes but will eventually yield a clean burn in the long run. However, if you want to get into a more detailed DIY smokeless fire pit building, the following options are also available for you.
Building a DIY Portable Smokeless Fire Pit
A portable smokeless fire pit is made of lightweight steel and is pretty convenient in terms of being able to change its location whenever it suits you and your needs. You can bring it on your outdoor camping trips, the beach etc…
Materials:
- 55-gallon steel oil drum
- Jigsaw with steel-cutting blade
- Rivet Gun
- Angle Grinder
- Steel Vice
- Hammer
- Ratchet strap
- 2 C-Clamps
- 1/8 of an inch drill bit
- Drill
- Steel 1/8 of an inch rivets
- Gasket rope and cement
- Heat Resistant Paint
- Gloves and safety glasses
Step 1: Create 3 lines. Measure 15 inches from the bottom of the drum going upwards. Make sure to mark it in several places around the drum’s diameter. The bottom section of the drum will be the outer layer of the fire pit. Next, measure 14 inches upward and mark it again to create the inside wall or the fire box. Finally, measure 1.5 inches down from the top and this will be what you will attach to the bottom piece to clamp the lid on.
Step 2: Cut the barrel along the 3 lines or the markings that you have made.
Step 3: Reduce the size of your firebox so it will fit into the outer layer drum section. Mark two lines down the side of the drum, 8 inches apart, then cut along those lines.
Step 4: It’s time to close the fire box section. Use C clamps at either edge to hold it together, tack weld in in 3 places then weld across the seam. Test the fit by putting it inside the body and make sure you have at least an even 1.5” space around the fire box. Don’t hesitate to squeeze or push the inner drum a little to get an even gap with its round shape.
Step 5: Take one of the lids of the drum and set your fire box on the lid. Make sure that you center it to make the lip around the edge even all the way around. Tack weld the pieces every 6 to 9 inches. Weld between the tacks to connect the pieces, alternating sections as you weld so you can connect every other section. Come back and weld the sections that you have skipped. This process will help not put too much heat in any one place and prevent warping.
Step 6: Trim off the excess material from your recently welded fire box and test fit by putting it inside the outer body drum part.
Step 7: Set the top rim of the drum on the lower section to finish your fire pit body. Use the angle grinder with wire wheel to remove paint around the seam and expose clean metal to weld. Use C-clamps on the seam to hold the rim in a couple of places as you tack weld every 6 to 8 inches. Use the same tack weld method in step 5.
Step 8: Use the second lid and set it on the fire pit body. Line a circle that is about 3 inches from the outside of the edge. Use a step drill to make a hole along the inside edge of the line you marked so you can make a place where you can start cutting. Cut out the center.
Step 9: With the top ring flipped, set your fire box on the top ring, make sure it is center with an even edge all the way around. Repeat the tack weld method from step 5 and 7 to connect every section of the pieces.
Step 10: Fit the fire box into the outer box once more. After checking its fit, drill holes at the bottom of your fire box. Make at least 20 holes in the bottom center portion of your fire box. The holes should be at least 7/8 of an inch in diameter.
Step 11: Drill holes around the bottom of the drum that will serve as the body to place your fire box inside. Measure 1.5 inches all the way around and mark along the circumference every 4 inches. Using a step drill bit, drill holes that are about 1 and 1/8 inch big.
Step 12: You need to create holes for secondary combustion. Measure 1.5 inches down from the top part of the fire box, all the way around. Mark every 3 inches along the circumference and drill, using a step drill, 9/16 hole on each mark.
Step 13: Use a hammer and softly flatten or bend (1/2” to ¾”) the inside lip around the top ring.
Step 14: Paint each piece with high heat resistant paint. Once dried, assemble the pieces. Wrap the lid clamp around the top ring and secure it to the body with a bolt. Don’t weld the fire box and the outer body permanently because it will make cleaning the DIY smokeless fire pit easy.
Step 15: Before you use the DIY smokeless fire pit, burn off any excess paint in the inside of the drum. This will burn off whatever bad smell or unhealthy fume causing elements from the drum. Once you don’t smell anything chemical or rancid, then it is safe to use the portable smokeless fire pit with your friends or family.
Conclusion
DIY smokeless fire pits are possible and they will definitely cost lesser than the ones you can readily buy from the stores. You do not even have to be a licensed engineer or an expert to start building one for you and your family.
Hi, I’m Adam and I’m a HUGE fan of Food and Cooking.
Do you enjoy grilling sessions with your family while staring at the beautiful fire pit flames?
Flame Gorilla is the site to learn how to have that perfect backyard experience.